- Add an Extra Field for a Schema Type
- Enable/Disable Schema Markup
- Add Ratings Using Shortcode
- Disable a Specific Schema Markup
- Add Schema Markup on Subcategories
- Disable the White Label Settings
- Disable Corporate Contact Schema
- Remove Home List Item from Breadcrumblist Schema
- Remove Shop Item Link on Product Page
- What is the future of Schema Pro now that SureRank has launched?
- How to Use Schema Pro with SureRank
- Test a Schema Snippet
- Mapping Your Schema Fields
- Add an Extra Field for a Schema Type
- How to Use the Schema Pro plugin?
- All-in-one Schema Pro plugin
- Map Required fields with Custom Fields
- Create a Custom Fields
- Target Specific Areas of the Website
- Enable/Disable Schema Markup
- Add Ratings Using Shortcode
- Implement Breadcrumbs
- Disable Schema Markup on AMP Pages/Posts
- Plugin Settings for Schema Pro
- Restrict Schema Pro Settings for Specific User Roles
- Remove Home List Item from Breadcrumblist Schema
- Delete Your Schema Data
- Regenerate Schema
- Configure Schema on a Single Page/Post
- Skip Rendering Invalid Schema
- Handle Errors & Warnings in a Testing Tool
- Configure WooCommerce
- Repeater Fields Controls on Pages/Posts
- WooCommerce Review Field Schema Markup
- Custom Schema Markup
- Compatibility with External plugins
- Rollback Schema Pro Plugin to Previous Version
- How to White Label Schema Pro
- Important Update: Sitelinks Search Box Deprecation
- Knowledge Graph with Schema Pro
- Configuring WooCommerce with Schema Pro Plugin
- How to Add a Schema markup for an Article on your website?
- Difference Between the Free and Pro Plugin?
- How to map fields with custom fields from third party plugins?
- Accept User Ratings from Users
- Update Schema Pro
- Register Your Copy of Schema Pro
- Organization Type in the Setup Wizard
- Schema Pro Setup Wizard
- Getting Started With Schema Pro
- How To Install Schema Pro Plugin
- Schema Markup for an Event page
- Schema Markup for a Review page
- Schema Markup for a Local Business Page
- Schema Markup for a Service Page
- Schema Markup for a Product Page
- Schema Markup for a Course page
- Schema Markup for a Recipe Page
- Schema Markup for a Person/ About Page
- Schema Markup for a Job Posting Page
- Schema Markup for a Video Object
How to White Label Schema Pro
Ever thought about giving Schema Pro a personalized and cool name that fits seamlessly into your brand? Imagine, rather than just “Schema Pro” on your WordPress dashboard, it could be “Super Schema Master” or “My SEO Secret Weapon.”
You have the power to add your own description and link it to your website, making it an integral part of your fantastic brand. This guide will take you through the steps of white labeling Schema Pro.
How to Whitelabel Schema Pro
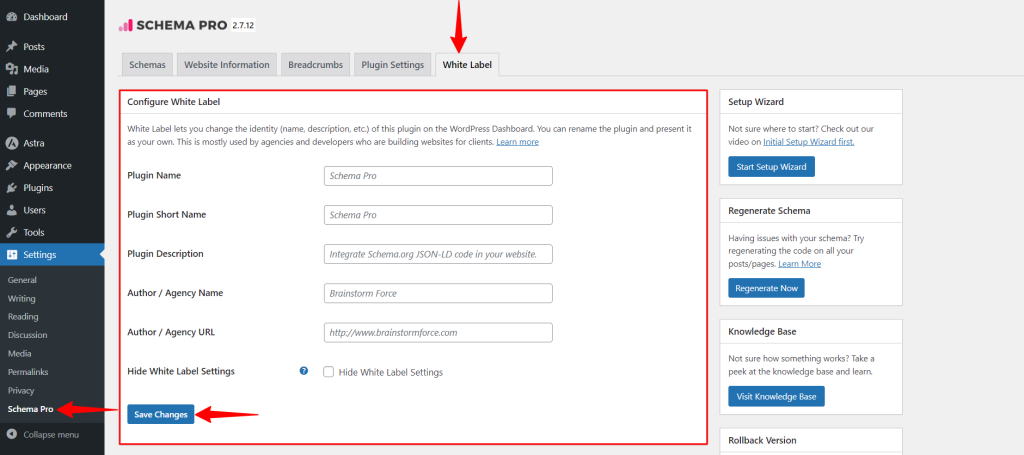
1. Click on the Settings menu in your WordPress Dashboard.
2. Click “Schema Pro” from the setting option in your WordPress dashboard.
3. Click the White Label option Tab.
4. Now configure the fields related to white labeling the Schema Pro.
The listed fields are: –
|
Plugin Name | You can add your desired name to the plugin. |
|---|---|
|
Plugin Short Name | Add a short name for the plugin. Eg: – MySchema. |
|
Plugin Description | Add a short description that describes the plugin’s nature. |
|
Author / Agency Name | If you are an Agency then add your agency name. Else if you are a freelancer you can put your desired name. |
|
Author / Agency URL | Add the URL of your Agency or your portfolio if you are a freelancer. |
|
Hide White Label Settings | If you wish not to show the White Label setting tab to your client then check this option. |
5. Once all settings are properly done then you click on the Save Changes button to take the effect.

6. Once the setting is saved the new name of the plugin will be shown instead of Schema Pro.
We hope this document has been helpful. If you have any questions, feel free to leave a comment below.
We don't respond to the article feedback, we use it to improve our support content.