We all know the importance of schema markup and how it is one of the essential parts of websites nowadays.
Search engines, especially Google try to understand your website better with the help of structured data or schema on your website. And they reward your website with rich results.
Here is an example of a product review in search results and how rich results can be generated for it. Besides basic information like title, description, URL you will observe advanced details like star ratings, reviewer, site links, date, and so on.

You might have observed such rich results when you search for products, reviews, recipes, flights, restaurants, jobs, people, concerts, etc. There are different types of rich results!
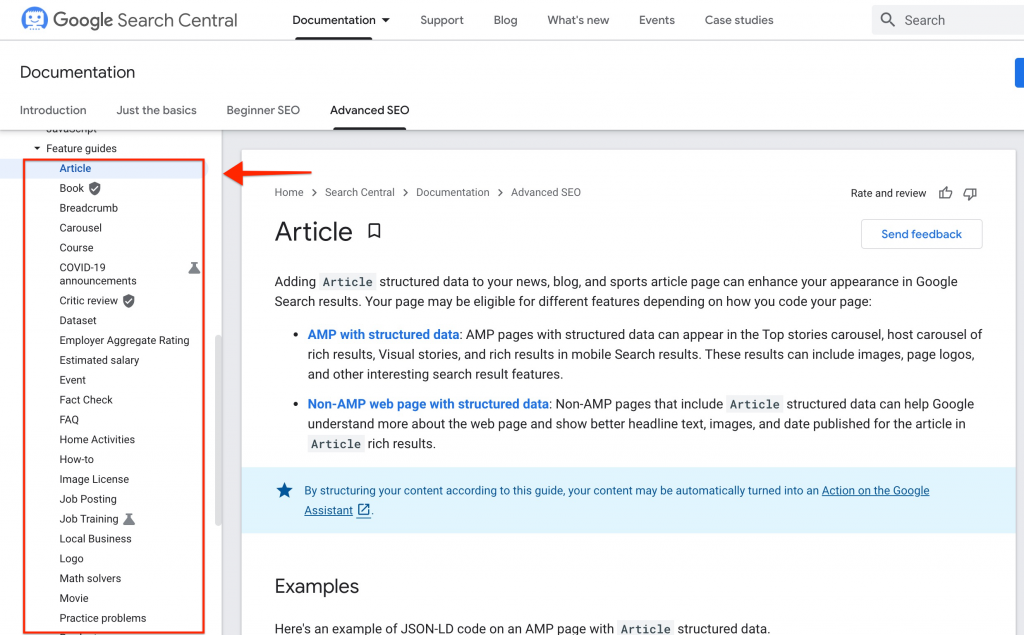
Google has a dedicated documentation that describes type of schemas that can generate rich results.
Of course, with Schema Pro you get your own schema solution for websites where you can easily configure schema.
But, there is a catch.
If you go to Schema.org, which is the official website for Schema, then you will observe that they support 779 types of schema at this date!
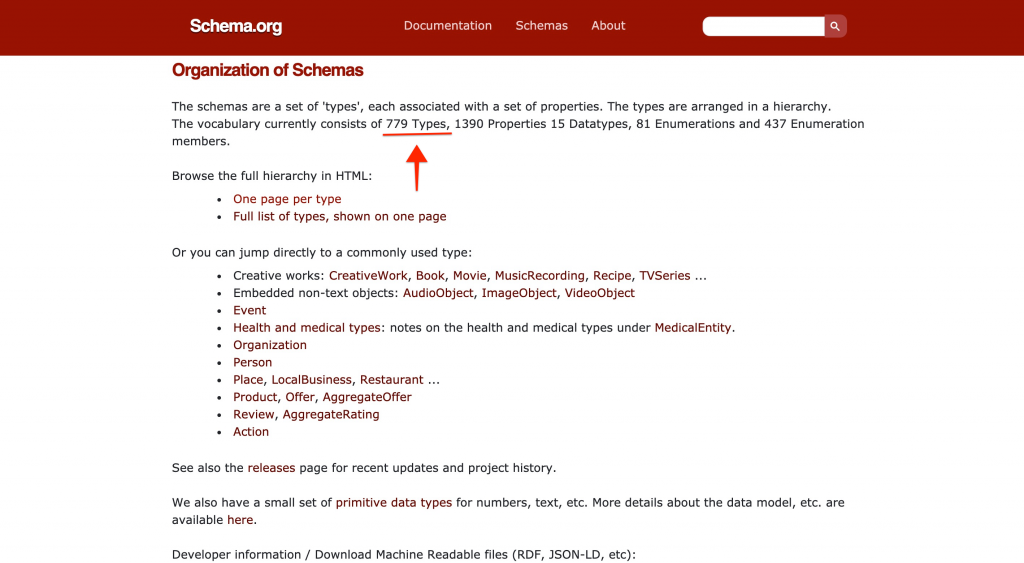
The important thing to understand here is that Google supports all 779 types of schema, but it returns rich results only for the types present in their documentation. While you can certainly add schema markup from Schema.org to your website but they may or may not generate the desired rich results. That being said, they will definitely help search engines understand your website better.
On the other hand, if you don’t find the related schema type with Schema Pro, you can copy it from Schema.org and add it to your website. If you need assistance with this, it’s a good idea to hire expert WordPress developers who can ensure the schema is implemented correctly and efficiently.
Now, the next obvious question is how to add this schema to your website. And the answer is get the custom code for your schema and add it to your website.
You can add it manually to your website or opt for an external plugin. There are plenty of plugins available in the market that lets you add custom schema markup. But with such plugins, it’s tough to add schema at specific locations on your website. Especially if you are a non-coder, working with a custom schema can be a real hassle. Also an extra plugin is always a load on the website.
Schema Pro already provides you with the easiest methods to add schema.
Additionally it now introduces a new feature – Custom Schema Markup.
This is an amazing option because not only do you get the option of adding custom schema markup to your website, but you all get all the benefits of Schema Pro with it. This means granular targeting options, easy modification of schema on a per-page-basis, and even custom field support!
How is this done? Check out our detailed video tutorial on how to add a custom schema to your website.
Prefer the written version? Let’s continue –
Custom Schema Markup Option with Schema Pro
As we understand, our website schema should be able to serve valid and filtered information to search engines. This way, search engines can better understand your website, which will ultimately help your website achieve a higher search results position.
Schema Pro is a revolutionary plugin that has broken down and really simplified this complicated process. It helps website owners add schema to their websites with ease.
Going a step further, Schema Pro now offers the freedom to add a custom schema of your choice.
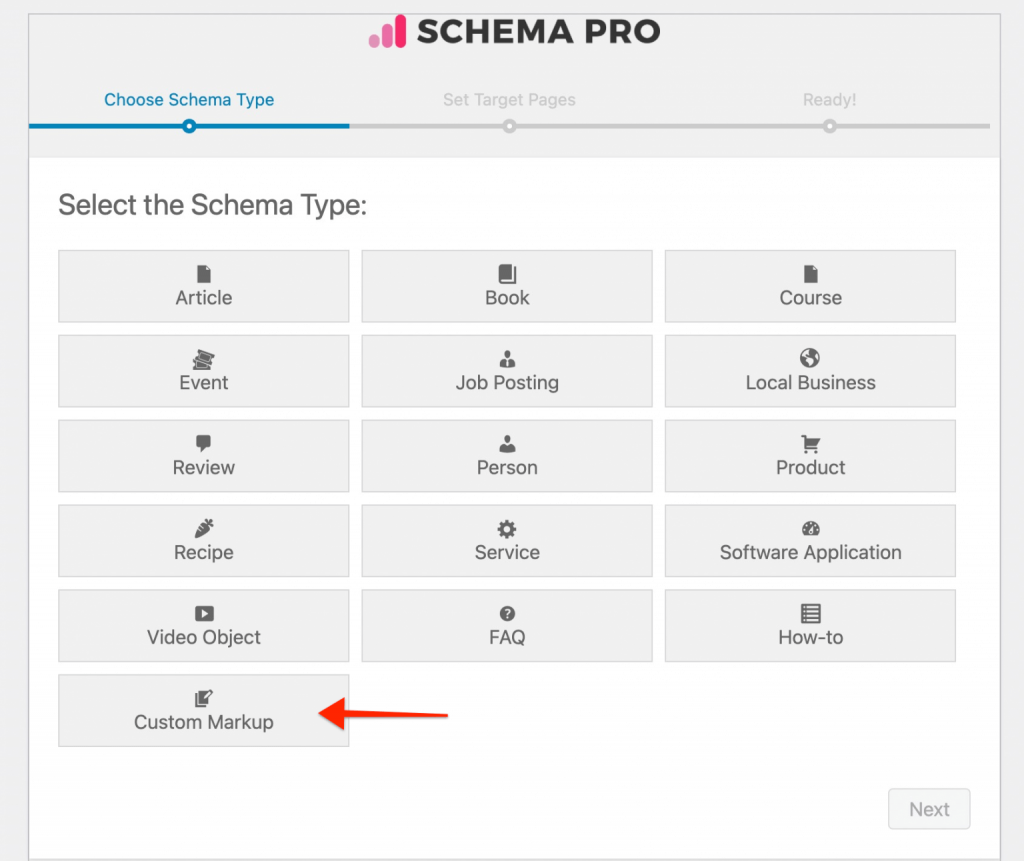
Here are some reasons why you will love this new feature,
- No third-party plugin required: This option comes native in Schema Pro. So you needn’t install an extra plugin to include your custom code.
- The easiest way to add custom schema code: Schema Pro is popular for its ease of use. Continuing with this, Schema Pro offers an easy process to add custom code. You can paste your code to a dedicated box and choose a location.
- Apply global as well as page-specific custom schema: You can choose to apply custom schema to multiple locations at a time. Or configure it on individual pages/posts.
- Powerful target rules: Schema Pro offers powerful rules to add your custom schema. With a combination of settings, you can target the exact location on your website from one place.
- Integration with third-party custom fields plugins: If you are using any plugin to add custom fields, Schema Pro will automatically detect them. It will make custom fields available in the custom markup box. You can choose and add custom code from the custom field directly.
- Clean code: Schema Pro does not add any extra code along with your custom code. This helps to keep custom code clean and lightweight.
Excited to see how to use this option? Let’s dive in!
Add Custom Schema Markup with Schema Pro
Before we start, we are assuming that you have installed and activated the Schema Pro plugin.
Step 1: Enable Custom Markup
The first step is to enable custom markup.
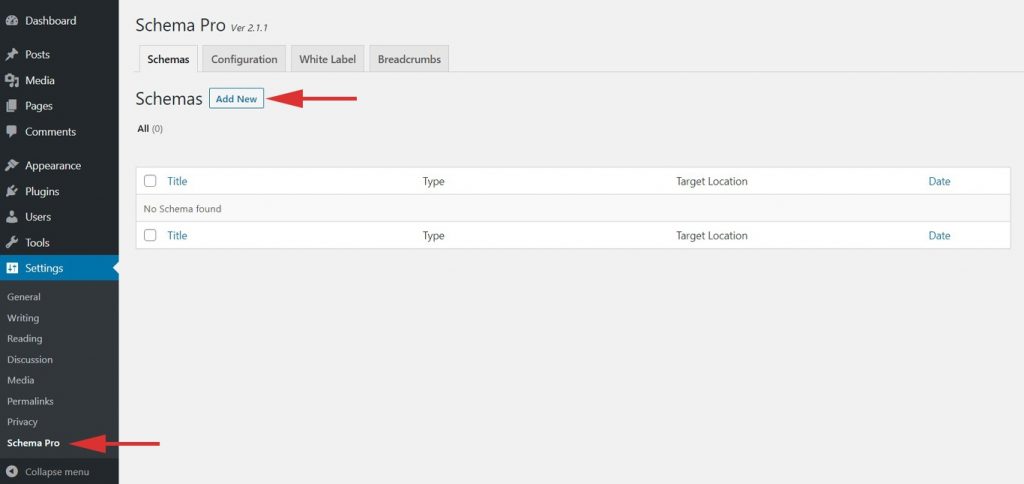
Head over to Settings > Schema Pro and click on Add New.
Then select Custom Markup and click on Next.

Step 2: Select Target Location
The next step is to choose the location where you wish to apply the custom markup.
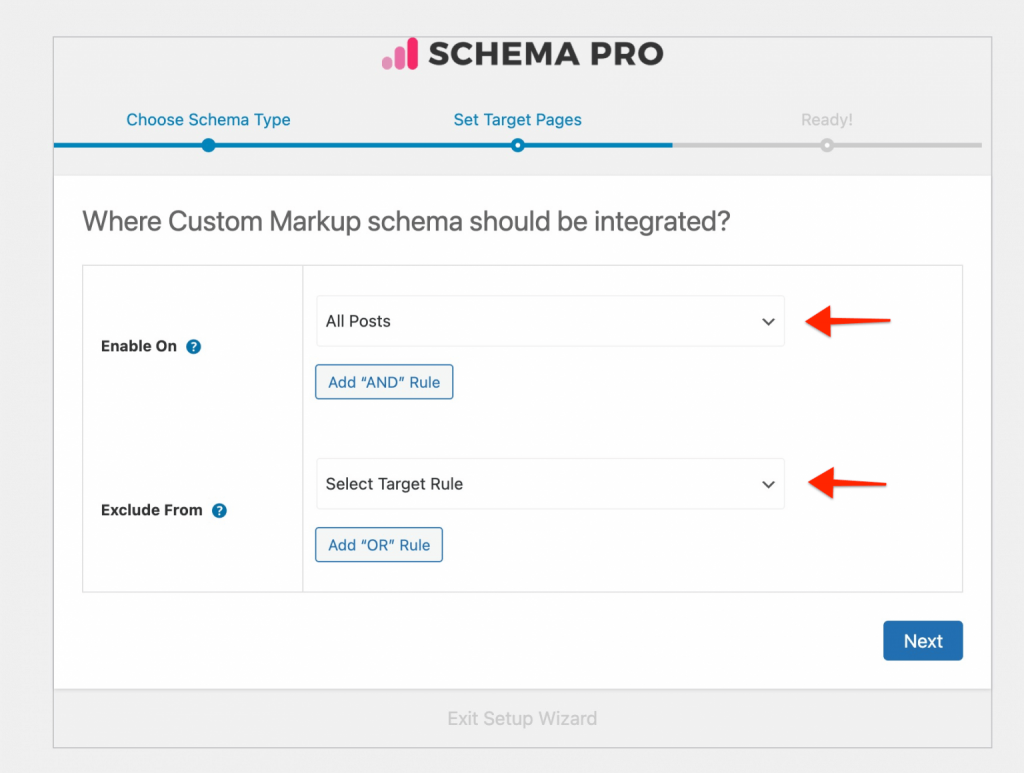
Select the target location from the options under Enable On.
You can choose from pages/posts/categories and other locations. You also have the option to exclude specific locations from the Exclude From option.
Once you are done, click on Next and complete the setup process.
Step 3: Edit Settings
You will be directed to a dedicated settings page for custom markup.
You can choose to add custom markup globally across a selected target location or choose to add it on individual pages/posts.
To add it globally, select the Custom Markup > Fixed Text option.
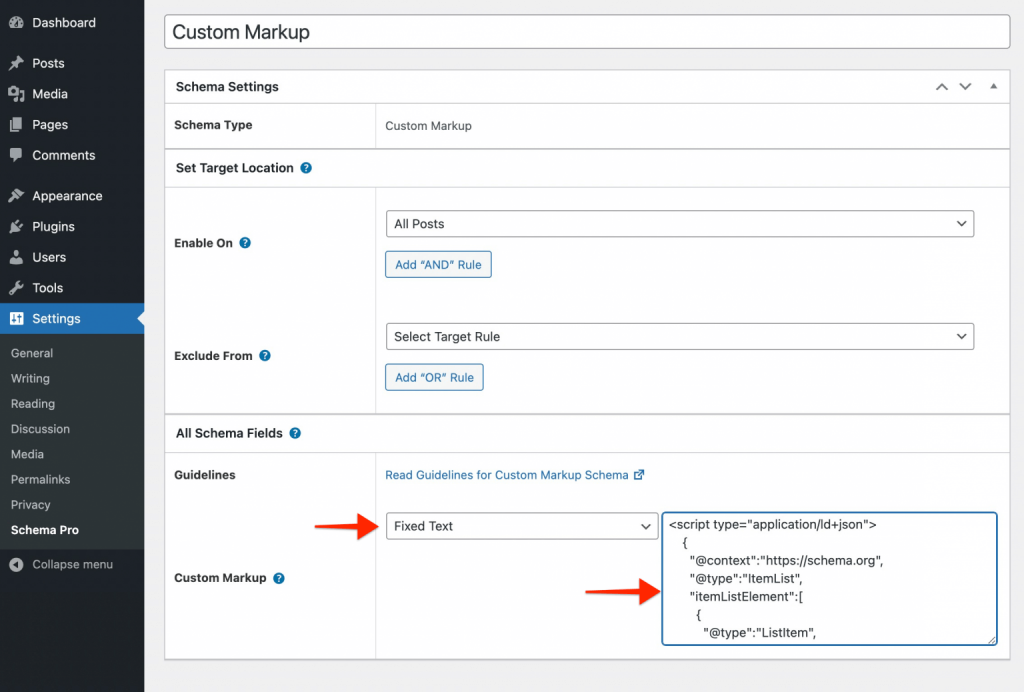
Add your custom schema markup code in a box. This code will be applied to the selected target locations.
To add it on page-level, select the Custom Markup > New Custom Field option.
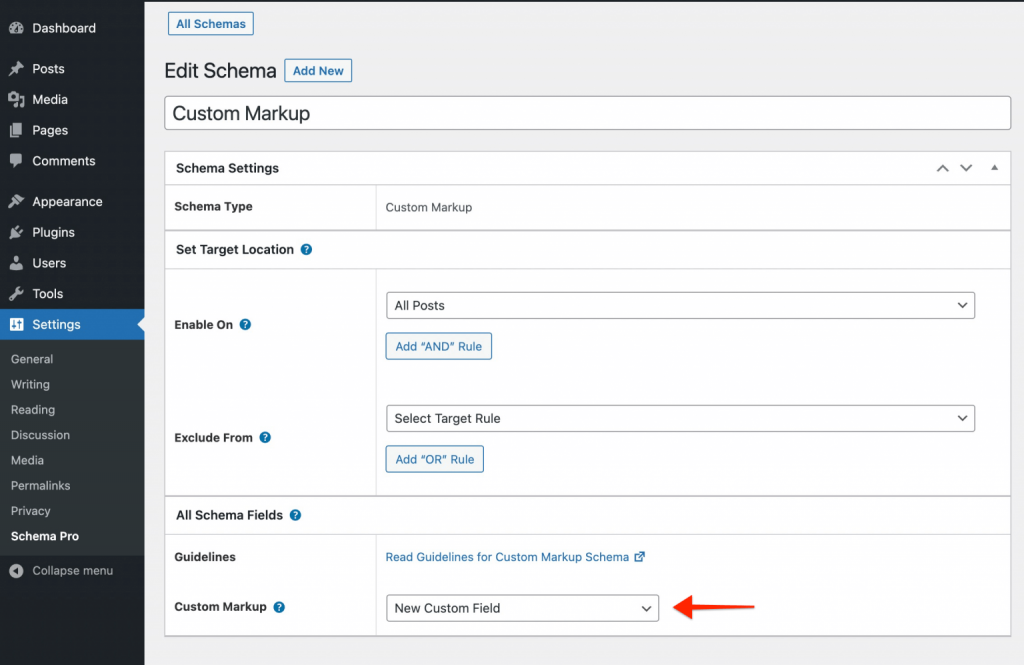
Now a dedicated custom schema box will be available on target locations.
Go to the specific page/post and edit it. Scroll down to the bottom of the page, and you will observe a new box named Custom Markup.
Here you can enter your custom schema code and save the page.
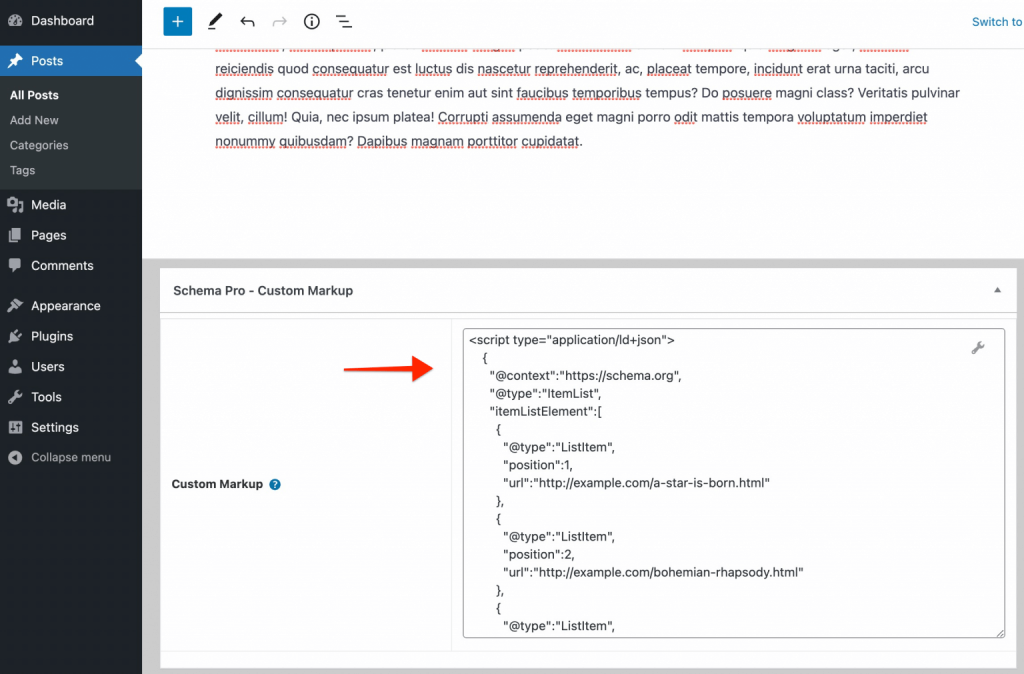
Done! You’ve just added your custom scheme code.
Go ahead and test this schema using Schema Testing Tool to ensure you’ve added a valid format.
Note: If you are not sure how to write custom schema code on your own, you can use online schema generators. There are many free tools available in the market and you can choose the one you like. Most of the tools give you a simple form where you can add required information and the tool creates schema code for you. You can paste this schema code with Schema Pro – Custom Markup option.
Update Schema Pro Today!
We’re guessing you are excited to give this new handy feature a shot.
Just update Schema Pro to the latest version and start adding custom schema markup quickly.
For your reference, we’ve included a link to our knowledge base on Add Custom Schema Markup With Schema Pro.
As always, in case of any questions, do write to our support team.
Let us know how you like this latest update in the comments below.
Until next time, cheers!


12 thoughts on “Introducing Custom Schema Markup: Add Any Kind of Schema to Your Website Easily”
Nice feature. BUT, users should be cautioned to ONLY markup content that is on that specific page. Otherwise, Google will disallow.
Also, in your BlogPost example, that was probably not a good thing to inject on all posts – the information on each blog page is different. I even think that that option should be disabled on blog posts.
Hello Brenda,
Thanks for sharing your concern. Yes, we have provided a Target rule so the user can add the required custom markup to all the posts if he requires the same type of Information schema on them.
Feel free to reach out to us through our Support Portal if need further help. 🙂
The ability to add schema to all posts in a particular category, tag, or custom taxonomy would be great,
Hello Alan,
Thank you for your request, we shall review and check with our development team. 🙂
Hi
Trouble adding an outline
Codes appear at the top of the site
A picture is attached
https://ibb.co/4RxZS83
Hello Mahmoud,
As per the screenshot, it seems the script tag is misspelled.
Please refer to the screenshot – https://share.bsf.io/P8u5qL05.
Could you please add the
I do not understand
Is there a solution to this problem, please?
You can visit the web page – [Link redacted]
I suffer from this problem
I want a solution, please
Hello Mahmoud,
We are looking into the issue. Once we get a solution, we will update you.
Sorry, due to the script tag the last comment wasn’t displayed clearly. Do check the same as well.
thank you my friend
I will be waiting for a solution as soon as possible
WP Schema plugin provides me with all the schema markup options. I like it very much.
The ability to Adding Schema to custom taxonomy pages will be a great addition to this plugin ..
Thank you for your request, Farhad!